“Sometimes the smallest things take up the most room in your heart”- Winnie the Pooh

Cinder toffee in Britain, Hokey pokey in New Zealand , Sponge toffee in Canada , Puff candy in Scotland , Sea foam in parts of USA and Angel food candy in other parts. So many names for something so simple- Honeycomb. Whatever you want to call it, it is super easy to make and super addictive to eat!
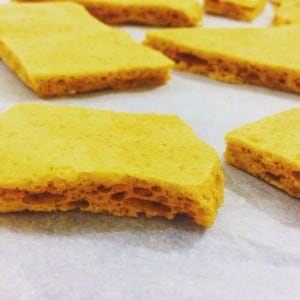
What happens here is a simple reaction , the base in the baking soda (sodium bicarbonate) and the acid in the honey combine to bubble up and give rise to those lovely spaces and crevices for that typical honeycomb appearance.
Oh . If you were a child in the 90’s , you may remember the CADBURY Crunch chocolate bar. Thats what chocolate covered honeycomb tastes like! (Whatever happened to Cadbury Crunch ? I haven’t seen it forever..)
Now that we have dealt with nomenclature,science and references , lets talk about the recipe. It just doesn’t get simpler the this . Three ingredients – Sugar , Honey (duh!) and baking soda. Plus some molten chocolate to dunk it in . You have a crunchy light caramel-y candy . Yum.
Recipe courtesy : Gemma Stafford
You’ll need:
- 100 grams or 1/2 cup sugar
- 85 grams or 1/4 cup honey
- 1 1/2 tsp baking soda
- 50 grams dark chocolate (optional)
Time : 15 mins + setting time
Makes : 5 x 2 inch sheet of honeycomb
Lets get started:

Line a baking sheet with parchment paper or oil it well. You can also just use a parchment paper/ foil spread on a counter .

In a saucepan , measure out the honey and sugar.

Heat on low while mixing continuously until the sugar melts. Do not let it boil or simmer. The mixture will become thick and sticky. This will take about 4-5 minutes

Now on medium heat , simmer it until it is a deep caramel colour . Do not stir or mix . This will take around 3 minutes. Make sure it doesnt burn.

Add the baking soda and immediately whisk it for few seconds . The mixture will bubble up and lighten.

Spread on your parchment / prepared pan . Try to move the pan to spread as much as possible. See the uneven parts of my honeycomb, thats because I moved it with a spatula as it was setting. Don’t do that!Let cool completely . This may take anywhere between 15 mins to half an hour depending on the thickness of your honeycomb and the climate where you are.

Break it into pieces as big or small as you want. Beauty is in asymmetry ( I say things like that to cover up my inability to be neat and precise!). Chop and melt the chocolate in a microwave / double boiler and dip the ends in. Let cool on parchment .
Also :
- Store in an airtight container for few days.
- If you want a thicker honeycomb , use a smaller pan (around 4-5 inches ). I have used a 7 X 4 inch pan.
- Keep your whisk and baking powder handy right at the beginning. Once you get the amber colour, you need to act fast.
- Make sure you stir in the baking soda well or else it ‘ ll be salty . But not more than a few seconds or the air bubbles will disappear.


For something that is almost all honey and sugar , this is not so sweet at all.. in fact it has a slightly burnt bitter tinge to it. Its light ,airy and crunchy . I ,of course , like it best dipped in chocolate. You can crumble some to swirl into your icecream- gorgeous flavour! As much as I like munching on it , I just love even more the look of these sponge-like golden shards of candy!