“When your life seems black n white, make sure that you dream in colour”- Owm’r Farouk.

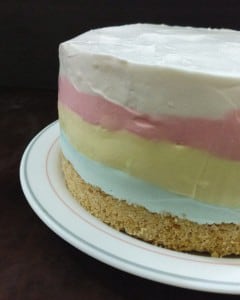
So , I saw this picture on Pinterest the other day of a rainbow cheesecake and bookmarked it for a rainy day (or you know, when there’s left over cream cheese) . My friend asked me to make something for her 9 year old girl and I knew the cheesecake would be perfect .
But what can I say ? I chickened out.. I don’t make that many cheesecakes and baking a single colour , one layer cheesecake freaks me out ! So… I chose the next best thing and made a No bake cheesecake! A task that seemed much more manageable to a cheesecake novice like me.
The recipe is a simple vanilla no bake cheesecake , one that I have tried before , light and creamy with that little tang that makes a cheesecake , a cheesecake. Obviously , you can skip the colours , a much easier task ! I would suggest halving the cream cheese batter . Making a almost-rainbow one like this (or a full rainbow if you want) , takes a lot more patience ,some more time and a few more dirty bowls . But …… how dreamy does this look ,right ?


Maybe someday I ll bring myself to bake a full rainbow cheesecake , maybe not. I do love the ease of these nobake versions ! It’s a great tasting dessert no doubt, but the almost whimsical look was what made it a winner for me. And you can play with it ! Use more colours , or use neon ones , use sprinkles on top , or swirl the colours for a tie dye effect !
Like the idea of a no bake cheesecake? You might like this Oreo cheesecake!

Pastel No Bake Cheesecake
Ingredients
- 100 gms digestive biscuits cookie (I used Marie)
- 1/4 cup or 56 grams unsalted butter , melted
- 1/4 cup or 30 grams icing sugar
For the cheesecake:
- 300 grams cream cheese , at room temperature
- 100 grams or 1/2 cup granulated sugar
- 1 tsp vanilla essence or extract
- 1 1/2 cups or 360 ml heavy whipping cream cold
- 2 tsp gelatin or agar-agar
- 60 ml or 1/4 cups water cold
- gel food colours of choice
Instructions
- Prepare your pan. Use a 6 inch springform pan if you have one , or use a mousse ring . Line the bottom and sides with parchment (optional but easier!) . If you don't have a springform pan or mousse ring , line the bottom of a regular pan with plastic wrap so that it comes up the sides of the pan (so you can pull it out once set).
- Powder the biscuits any way you want. Use a food processor , blender , mortar , rolling pin or your hands!
- Add the melted butter and icing sugar and mix until it comes together like wet mud !
- Press into the bottom of your prepared pan. Refrigerate until you make the filling.
- Sprinkle gelatin over the cold water. Let stand for 5 minutes . Then heat in microwave or stovetop to melt it. Let cool while you make the filling.
- Whip the cream to soft peaks. Keep refrigerated until needed.
- Beat together the cream cheese , granulated sugar and vanilla until smooth.
- Fold the whipped cream into the cream cheese filling.
- Fold in the gelatine liquid.
- Divide filling equally into as many bowls as you are using colours. Add a drop of gel colour to each. I used pink, yellow and blue , and kept one plain. Mix colour well in each bowl. Add more until you get the desired colours.
- Spread filling of one colour over the biscuit base as smoothly as possible. Freeze for 10-15 minutes or until set.
- Spread the other colours in the same way , freezing in between.
- After spreading the final portion of coloured filling , chill for atleast 4 hours or overnight .Un mould the cheesecake or lift out of pan , remove the parchment . Smoothen the top using a spatula . Keep chilled until its serving time !
Notes
- You can keep this cheesecake refrigerated for 3-4 days.
- If you use a 8 or 9 inch pan , you can use the same amounts but you'll have thinner layers
- Always add one drop of colour first, mix well and add as needed. Too much colour can alter the taste of the cheesecake.
- Use agar agar instead of gelatine if you are a vegetarian. If you want a more firm set cheesecake , use 1 tbsp of gelatine .